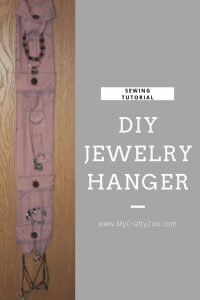
Jewelry Hanger DIY Upcycled & Fabulous!
Learn how to make a jewelry hanger from old sheets or fabric you have laying around. You’ll love your talent and it has a space for everything!
Good day all! It is a rainy fall day here in Arkansas! Looks like it is trying to flood us! I really don’t mind the rain sometimes, today, however it is aiding my narcolepsy in kicking my eyes closed! It’s okay though, my brothers are home (recent additions to the Zoo) and they will keep me entertained, stimulated, and awake! I am so thankful for my baby brother! He hasn’t always done right, but he has always loved me and made me smile!
Well, enough of the random thoughts! On to my latest project! We are doing homemade gifts for Christmas, so I am making all sorts of things. I decided to try my hand at making a jewelry hanging for a friend, so here it goes!
Jewelry Hanger
DIY Upcycled & Fabulous!
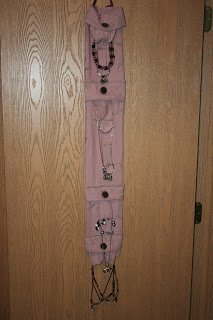 I used a comforter cover, which conveniently had buttons! Yay! I cut it at 34″ long and 6″ wide. There are 3 layers to make it have some bulk so that it would be sturdy.
My picture didn’t get the top, but I used ribbon sewn to the top to hang it, which is why it’s slumped in at the top. I was going to use wire, but I couldn’t find my wire cutters.
 I made the ring holder using scrapbook rings, but there again I was going to use wire…. The piece that holds the ring holder on is sewn directly to the fabric so it won’t come off, hence using something that could be unclipped.
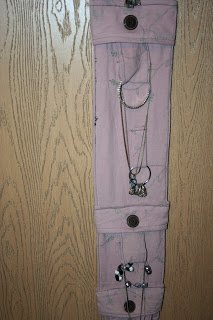
 The material that holds the necklaces is cut at 4×6. With two pieces of material for the outside and one in the middle.
I did them like you would a pillow, layering the front of the material to front of material, then the middle backing on the top. Sew it around 3 sides then flip it right side out. Fold in the top halves and sew shut.
I took the part to hold necklaces/bracelets and sewed it directly onto the fabric. Once I got it where I wanted it, I buttoned the button to figure out where to do the top. It’s made so that you can pull the button hole material up.
I sewed the button hole material on the top only, leaving enough on the ends (about one to two inches) to overlap so that I could fold it over. I used fabric glue on the back so that there wouldn’t be anymore seams. 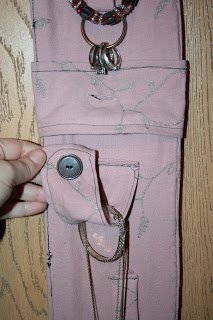
Here are some other DIY gift ideas you can do! I love handmade gifts, receiving and giving them!
I would love to hear your ideas for homemade gifts! I’ll be posting more as the days creep up to Christmas! Which reminds me, I have a tab of things full of Christmas stuff, gifts decor etc is my goal to fill it! Stop by and check it out!
Remember, entrance to the Zoo is free so long as you don’t feed the animals! I’ve found that once you feed them, they want to stay! (Plus some of them bite, but we’ll talk about that later!)


Love this idea! Thanks for sharing @’Sew Cute Tuesday’! I’ll be featuring you tomorrow, so be sure to stop by and grab a ‘featured’ button!
Great job on the jewelry holder! So inventive! Thanks for sharing your crafty self at the Tuesday To Do Party!
Smiles!
Jami
http://www.blackberryvine.blogspot.com